Friday 29 June 2012

thank you in aqua

I was asked by a woman to make some thank you cards for her, this is the first one that I designed. 

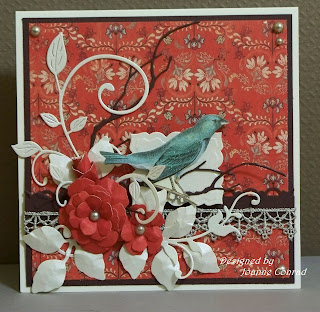
I really love the pattern and details in this flower and leaves.  I didn't start out to make a brown flower.  I knew I wanted to use this stamp and I intended for it to be layers of different colours with only the bottom layer in brown, but I loved the brown on brown so much that I continued on with the other layers too!  and once I had the flower made this aqua paper complimented it nicely.

So, all the paper for this card came from Michaels.  The card is made from a medium aqua Bazzill cardstock and the designer paper is Recollections - Aqua Screen.  The ribbon is a wide aqua organza ribbon that I had from the dollar store.  The brown trim on top of the ribbon was done using EK - Medallion Chain double edge punch and Recollections - Kraft paper.  This is one of my favourite punches.  I glued a line of twine in the middle, Sew Easy Fancy Floss - Blue Lagoon.

The flower stamp is SU - Triple Treat Flower.  I stamped it 5 times on the Kraft paper with SU - Chocolate Chip ink and 3 of the flowers were cut out with SU - Fancy Flower punch.  I overlaped 2 of these almost half ways and this made the bottome layer of the flower. I attached this to the card with Skor tape.  The third one I shaped just a bit with a paint brush handle and I placed it in the center of the first layer.  The fourth flower was cut out using SU - 5 Petal Flower punch and this cut out just a portion of the stamped flower.  This was also shaped just a bit and popped up as the next layer.  I added a few very small white half pearls to this flower layer.  From the fifth stamped flower I used SU - 1/2" circle punch to cut out the center of the flower.  This circle was shaped on a soft mouse pad and popped up for the center of the flower. 

The leaves are SU - Day of Gratitude.  They were stamped on the Kraft paper and cut out with scissors and glued to the card around the flower. 

The butterfly was stamped with SU - Papillon Potpourri and SU - Really Rust.  I stamped it on Recollections - White Glimmer paper, this paper has a soft shine to it which you can see in the picture.  The butterfly was cut out with the coordinating SU - Butterfly punch, shaped a bit and glued to the card.

The sentiment tag I cut out by hand using the same Recollections Glimmer paper.  The stamp is SU - Thank You Kindly and I used Stazon - Jet Black.  I cut a second tag just a bit bigger from the Kraft paper and layered it under the sentiment, punched a hole in the tag and tied a piece of twine through the hole.  I popped this up on the card.  A few white half pearls in the corner finished the card.

This was a really fun card to make.

Thanks for stopping to take a look :)


Tuesday 26 June 2012

peachy birthday

I wanted to use some things on this card that I really liked but hadn't had a chance to use yet lol, you know the stuff!

The first was this peach Bazzill cardstock and the second was this beautiful paper from DCWV matstack - The Tradewinds.  This is such a great book of paper, every piece is just gorgeous.  All of the brown paper layers are SU - Chocolate Chip.  The border is Martha Stewart - Arch Lattice punch and the pleated ribbon is some that I found in a scrapbooking store in New Brunswick while visiting my parents, it's a vanilla colour.

The stamp set is from SU - Apothecary set - the third thing that I wanted to use.  I stamped it with Stazon - Jet Black on SU - Very Vanilla and watercoloured it with Staedtler watercolour pencils.  For the center of the flowers I used Recollections - Microbeads in Champagne.  I love using these for flowers.  Put a dab of glue, sprinkle some microbeads on and shape them a bit as they start to set.  When the glue is completely dry, add more glue over top of them.  Make sure that it's a glue that dries clear.  This sets them in place and there's so many colours available!

I used SU - Labels Collection Framelits to cut out the layer of peach cardstock and the layer with the Apothecary stamp.  To get the brown layer, I traced around the outside edge of one of the framelits and cut it out by hand.  This is easy to cut out and gives you closer layers.  This set of three framelits was popped up.  The framelits are the fourth thing that was waiting to be used in my craft room!

The banner is SU - Take it To Heart and was stamped with Stazon - Jet Black.  I coloured the edges with SU - Dusty Durango marker.  The sentiment is from the Apothecary set and also stamped with Stazon.  The banner was cut out and popped up.

The last details are the stick pin with a variety of beads, the butterfly which is cut and embossed using SU - Beautiful Wings, and a Die-namics - Leafy Flourish.  Both the butterfly and the flourish were cut from brushed gold cardstock - sorry I don't know the name.  A few half pearls and my card was finished -

AND I got to use lots of things for the first time :)

Thanks for taking a look.

Little Bird!

Haven't posted for a couple of days - life's just busy at the moment, which is good!  I'll see if I can post a couple of cards now.

This is a birthday card that I made for my friend Diane.  I didn't add a Happy Birthday sentiment on the outside of the card, I put it all inside.  So really this card could have been used for several occassions.

I started with a dark teal Bazzill cardstock and added a layer of SU - Very Vanilla.  The next layers are the dark teal topped with K&Company - Teal Floral & Letter.  The lace is from Micheals and the beautiful pleated ribbon is SU.  This second layer is popped up.  The third layers are SU - Chocolate Chip and BoBunny - Gabrielle Mocha Die Cut.  This paper was round and had this beautiful cut edge on it - love it.  This layer was popped up too.

The medallion was cut from SU - Very Vanilla using Spellbinders - Fancy Tags Two.  I sponged the center with SU - Crumb Cake.  The leaves are all die cut from SU - Pear Pizazz using Cheery Lynn - Fanciful Flourish and Memory Box - Tender Leaves.  The little flowers are Prima Flowers.

The bird was stamped using SU - Young Vermilion and Stazon - Jet Black.  I watercoloured it very softly with SU - Watercolour Crayons in Baja Breeze, Soft Suede, Early Espresso, and Tangerine Tango.  When I watercolour on cards, I always use Ink Potion # Nine because it doesn't warp the paper.  I cut him out and curled him just a bit, then popped him up.

The final touches were the soft gold ribbon from the dollar store, the light blue half pearls, and the stick pin with a variety of beads.

Hope you like this card, I loved making it :)

Thanks for taking a look.

Wednesday 20 June 2012

A Meadow Birthday

I made this card for my friend Sherrie's birthday.  I had just got a new stamp set from La Blanche called "Meadow" and really wanted to use it - hope you like it.

The card is made with kraft paper and watermarked with Versa Mark ink and SU - Elements of Style.  On SU - Very Vanilla paper, I stamped the background with SU - En Francais using SU - Creamy Caramel.  I tore two edges of the paper and sponged Creamy Caramel around the edges and here and there over the paper to give it a distressed look. 

The flowers are one of the two stamps in the La Blanche - meadow set.  They are stamped in Versafine - Majestic Blue.  These are beautiful stamps to work with, they give a very clear, crisp image - love them.  I rolled the torn edges inward which is kind of hard to see in the picture.  I then took a dark blue Bazzill paper and tore the same two edges on it but trying not to match the torn edge on the Vanilla piece.  The edges of this one are rolled as well.  I added two small copper coloured brads and some SU - Beautiful Wings butterflies.  These two layers were then attached to the card.

The flower was made using SU - Build A Blossom punch and Floral Fusion die with a variety of designer paper.  Each petal was rolled and shaped using the end of a small paint brush.  The petals were also sponged with either the Majectic blue or Creamy Caramel.  A peach half pearl was added to the center.

The happy birthday stamp is SU - Something to Celebrate in Pumpkin Pie.  It was cut out with SU - Decorative Label punch.  I punched it once, then put it back in and punched it again to get a smaller label. 

The other flower stamp in the set is just as pretty, I'll have to use it soon.

Thanks for taking a look :)


Tuesday 12 June 2012

Grandbaby!

This is a card that I made a while ago to congratulate a couple on their first grand baby!  They were so excited to welcome the little one.

The card was made using a bronze metallic cardstock, a layer of white and then a layer of designer paper - this paper was just in my collection sooooooo, I don't know the name.

The stamp set I used was SU - Teddy & Train and I stamped them in Stazon - Jet Black.  I coloured the two images using Staedtler watercolour pencils and blended them with an aqua pen filled with Ink Potion #9.  This is the best stuff, it's clear and works just like water but doesn't curl the paper!

I used EK - Dotted Scallop punch under the train and the teddy is layered over Spellbinders - Classic Scalloped Squares Small.  I added a little ribbon and a few pearls and the card was done.

This is the verse I found for the inside - love it!


Thanks for checking out my blog :)


Sunday 10 June 2012

Dad's Birthday

This card I made for my father in law's birthday, he and all 5 of his sons are crazy about old cars, so the card had to have one on it.  He is a real sweetheart!

The base of this card is a very dark brown Bazzill cardstock and the wood grain background is a piece that I had in my collection - sorry I don't know the company.  The brads in the corners are K&Company - Rough & Tumble.

I used Spellbinders - Labels Twenty and SU - Cajun Craze for the background behind the car.  The car is from a sheet of Graphic 45 - A Proper Gentleman Collection.  This sheet is full of cars, I just cut out one and layered it over some of the dark brown cardstock.

Happy Birthday was stamped with Stazon - Jet Black on some off white cardstock.  The stamp is from SU - Elementary Elegance.  It also was cut using Spellbinders - Labels Twenty.  I used Spellbinders - Fleur De Lis Accents to cut the shape behind the Happy Birthday.  This was done using the dark brown cardstock.  I popped this up on the card.

The twine holding the banners is Sew Easy - Blue Lagoon.  The pennants were punched using SU - Petite Pennants Builder.  I love putting these on cards, it makes it seem more festive, and when you add music sheets - it's perfect for a birthday!  The back colour is the dark brown cardstock and the music paper is BoBunny - Et Cetera Symphony.  These little pennants are also popped up.

Enjoy your Sunday and thanks for taking a peek :)


Poinsettias


This Spellbinder - Poinsettia is just beautiful and it's so easy to make these flowers.  It comes with 4 different size petals so you can use them all and have a big flower or use just the smaller ones for a smaller flower.  This is the card that I made with them - even though Christmas isn't for a while!

I started with a white card base and layered brushed gold metallic cardstock (sorry I don't know the name of it) and then SU - Cherry Cobbler.  I used Spellbinders - Floral Ovals to cut the brushed gold fancy oval.  This is another set that I have used a lot -it's just perfect for so many cards.  The inside oval is SU - Very Vanilla cut with Spellbinders - Classic Ovals Small.  I embossed this oval with SU - Square Lattice folder.

For the large poinsettia I used all 4 of the flower dies and I cut each of them out twice in SU - Cherry Cobbler.  For the small flower I used just the 2 smallest dies and cut each of them out twice also in Cherry Cobbler.  I shaped the petals very softly on a soft mouse pad - the spellbinder embosses nice veins in the petals and I didn't want to loose these lines.  Most of the shaping was in the middle part of the flower so the center would be indented and the petals would flow up from there.  Once everything was shaped I glued the layers of petals together, slightly offsetting each layer from the last.  The flowers were then glued onto the card. 

The centers were done with Micro Beads, I used Recollections - Champagne.  Put a nice blob of glue that will dry clear in the center of the flowers and sprinkle the beads into the glue.  As the glue dried I tapped the beads down into the glue and shaped it a bit.  This way you can get the shape the you want and get rid of any beads that are sticking off.  As the glue continued to dry, the center fell inwards leaving a cool looking flower!

I added 3 poinsettia leaves in a medium green cardstock, these big leaves are part of the Spellbinder - Poinsettia.  The holly leaves were cut from some dark green cardstock using Martha Stewart - Holly punch.  A few leaves in white using Martha Stewart - Branch punch were added.  A flourish was placed using Die-namics - Leafy Flourish, I cut this from Recollections - Gemstones.  The last leaf was cut from a lighter green cardstock using Poppy Stamp die - Meadow Leaf.  Red berries were glued in around the holly leaves.

Thanks for looking :)


Friday 8 June 2012

Morning In The Orient!

This card was just picked as one of the favourites of the week on Splitcoaststampers - so exciting!!!  June 10/12


As soon as I saw this paper, I knew this card had to be made, lol.

This is a 6" x 6" card made from SU Very Vanilla, and a layer of SU Chocolate Chip.  The desinger paper is from Authentique - Carefree.  In the background there is a band of Chocolate Chip punched with Su - Scallop Trim Border.  The antique lace is from my collection.

The base behind the bird was cut using Spellbinders - Labels Twenty Three from paper by Recollections - Gemstones.  This paper is the same colour as SU Very Vanilla but it has a soft pretty shimmer.  The flowers were cut using Spellbinders - Rose Creations and they were cut from paper in Authentique - Carefree.  I shaped them on a soft mouse pad before they were layered together.  An off white half pearl was added to the centers.  The leaves were also cut from Recollections - Gemstones using Spellbinders - Foliage and shaped on a soft mouse pad.

Flourishes were added using Cheery Lynn - Fanciful Flourish, Die-namics - Leafy Flourish, and Memory Box - Woodland Branch.  The blue bird is from K&Company - Bird & Butterfly Layered Accents :)


Easter Egg Hunt

This is one of my Easter cards that I made this spring.  They were fun to make and even more fun to give to family as we celebrated Easter!

The card was made from white cardstock.  The front has a layer of medium pink Bazzill paper.  The designer paper was some that I had in my collection, I'm afraid I don't know the company name.  The background under the medallion was cut from white cardstock using Spellbinders - Lace Doily Motifs.  The little girl was stamped with Stazon - Jet Black using is a SU set - Easter Blossoms.  I sponged the background with Versafine - Majestic Blue and SU - Summer Sun.  The frame around her was cut from the same medium pink Bazzill paper using with Spellbinders - Classic Scallop Ovals Small and an oval was cut in the center of this using Spellbinders - Classic Oval Small.  I punch holes in each of the scallops with a paper piercer and a soft mouse pad.  This frame was glued over the image of the little girl and popped up in the center of the lace doily.
 

I decorated the card with Tim Holtz - Mini Flourish die in a light green Bazzill cardstock.  The leaves were cut from a medium green Bazzill cardstock using SU - Little Leaves and SU - Biuld A Blossom.  The 2 smaller flowers were created using Matha Stewart - Hydrangea Punch and were cut from a stone coloured Bazzill cardstock.  The larger flower was cut from a Cuttlebug - Flower die, Su - Floral Fusion, and an EK - Small Daisy punch all in the same stone coloured cardstock.  I sponged them all with SU - Cameo Coral and shaped them on a soft mouse pad.  The small flowers have yellow Flower Soft glued in the centers and the larger one has a white half pearl.
 
I added leaves from white cardstock using Martha Stewart - Branch Punch and pearl strings that I found at our local dollar store.  The sentiment is SU - Something To Celebrate and was stamped with Stazon - Jet Black.  I sponged arond the little banner with SU - Wild Wasabi.  The Easter eggs are from the same SU - Easter Blossoms set.  I embossed them in white on blue and pink carstock and cut out around them.  I added a little butterfly that I cut using Su - Beautiful Wings, I layered two of them together.   A few more white half pearls placed among the leaves finished the card.
 
 
This is the inside of the card.  The verse is half my words and half someone elses.  The little Easter eggs were created the same as the front.  The corner punches are Martha Stewart - French Scroll.

Thursday 7 June 2012

Bird, Butterfly, and Blossoms!


Good morning!

This is a card that I made for our daughter to congratulate her on finishing her first year of law school.  She did a fantastic job!

The card is white cardstock with a layer of SU Early Espresso, one of my favourite colours.  The designer paper is Kaisercraft - Secret Bird Society Collection.  The whole sheet is beautiful, this is just a small section of it.  It is hard to tell from the picture, but the designs of the bird, flowers, and branches are all a beautiful coppery brown metallic, so the card has some shine to it.  There is another piece of designer paper over this but unfortunately, I don't remember where I pick it up from.  I added a piece of white doily.

I wanted this card to feel like a beautiful spring day, so I added the branch with the blossoms.  The branch is cut using Memory Box - Woodland Branch Die and the leaves are Memory Box - Tender Leaves Die.  This branch die is so versatile, you can add the leaves or leave it bare for winter.  You can use it as a full branch on a tree or have it as an accent twig sticking out behind some flowers.  I love it!

The branch is cut from SU Early Espresso and the leaves are cut from some scrap green - I always have little pieces of a variety of greens laying around that are just right for leaves.  The flowers are cut using a Recollections Punch.  I sponged around the edges with SU - Cameo Coral and then shaped them using a soft mouse pad.  A white half pearl for the center finished the little flowers.

The butterfly is cut using Memory Box - Vivienne.  This is such a pretty butterfly and can be paired with Memory Box - Darla which is a solid cut out of the same butterfly.  These two butterflies are pretty alone or together.  For this card I just used Vivienne.

Thanks for looking :)


Wednesday 6 June 2012

Cardinal Christmas

This card has so many things that I like - cardinals, snowflakes, and one horse open sleighs!  It was fun to make.


The card base is white 5" x 7".  There is a layer of dark blue Bazzill cardstock, I'm afraid that I don't know the name of the colour.  The embossed silver layer is from Dollarama, it's not very thick paper but it is very pretty.  The picture in the window is from an older SU set.  I stamped it with Stazon - Jet Black and coloured it with Staedtler watercolour pencils, then used a Sugarloaf blender marker to blend the colours.  I covered the image with Scor tape and Glitter Ritz - Transparent Micro Fine Glitter - Cool Highlights.  You can't tell from the picture but the image in the window is very sparkly!  This image was then taped to the card.


The window was cut out using Heartfelt Creations - Decorative Window Scene die in white cardstock.  I sponged around the window with SU - Chocolate Chip.  The dark blue Bazzill cardstock was used to cut the background for the window.  If you place the die on your cardstock and trace around it with a pencil, then cut it out with scissors, you get a slightly larger image than the die will cut out.  It will have no cut out details, it's just a solid shape of your die.  This is an easy way to create a matte for behind almost any die.  I glued the white window onto the blue window matte and popped it up over the stamped picture.


The cardinal is from Heartfelt Creations - Cardinal Pine Cone Border.  It was stamped with Stazon - Jet Black and coloured with watercolour pencils and the blender marker.  I cut it out and popped it up.  Around the cardinal I added snowflakes from SU - Northern Frost and leaves with Martha Stewart's - Branch Punch.  The little sentiment is a stamp from SU.  I cut a label out using SU - Decorative Label, then put the label back in the punch and cut it down a bit smaller.

This is the inside of this card, fairly simple.  There is a layer of dark blue Bazzill cardstock and a layer of white cardstock, both have been cut using Spellbinders - Labels Five.  The verse I printed using the computer.   The verse is part my words and part someone elses.

Hope you've enjoyed this card :)


Old World Santa

This is a card that I made for Christmas last year.  I found these old world santa stamps and just had to use them!

The card is 5" x 7" and is made with SU - Cherry Cobbler.  The next layer is SU - Very Vanilla.  I used a Cuttlebug embossing folder from the Winter Wonderland Set ( this is a set of 6) across the top and added Star Dust Stickles to accent some of the dots in the embossing, also a few rhinestones for a little bling. 

The santa is from Inkadinkado - Santas set and is stamped with Stazon - Jet Black.  The poinsettia is a layered flower which I popped up.  It's from K&Company - Visions of Christmas, Red Layered Accents.  This is a  package of layered poinsettias, bows and holly, and Christmas ornaments and are fun to add to cards.

The sentiment is from SU and is stamped in Cherry Cobbler and also sponged around the edge with Cherry Cobbler.  The tag underneath is a SU punch - Decorative Label.  I cut the tag out and then put it back in the punch to cut it down and make it smaller.  The tag is the popped up.

This is the inside.  The santa is from the same set of old world santas stamped in Stazon - Jet Black on SU - Very Vanilla.  The verse is in a set from Inkadinkado - Holiday Classic Expressions.  I stamped it with Versa Mark Ink and embossed it with SU - Cherry Cobbler embossing powder.

I love Christmas!  Thanks for looking :)

O Come Let Us Adore Him...

Every Christmas 8 of us get together for a night of card making.  Each of us design a Christmas card and prepare kits for the other 7 to do.  At the end of the night we each have 8 beautiful cards to take home and the evening is full of laughs and good times.  This is the card I designed last Christmas.

The card is 6" x 6" and is made from SU - Cherry Cobbler, love this colour!  The holly and pine paper is K&Company - Glad Tidings.  The smaller square measures 5" x 5" and is also a layer of Cherry Cobbler and the designer paper.  I added red satin ribbon around this layer then popped it up on the center of the larger card. 

Next I cut a pendant using Spellbinders - Fleur De Lis and copper metallic cardstock.  This was glued to the card.  The stamp is Cornish Heritage Farms - We Three Kings, I like its worn, textured look.  I stamped it on SU - Very Vanilla and then cut it out with a Spellbinders - Labels Twenty.  Over this I put a layer of Scor tape which is very sticky and spread Glitter Ritz - Transparent Micro Fine Glitter - Cool Highlights over it.  It's hard to tell from the picture, but the Very Vanilla cut out is very glittery.  A few red half pearls finished the front of the card.

This is the inside of the card.  The verse was printed on Very Vanilla paper using my computer and then cut out using Spellbinders - Labels Twenty.

Thanks for looking :)


Tuesday 5 June 2012

Butterfly Easel Cards


A few months ago my friend Carol and I were looking at cards on the internet and came across Bronwyn Eastley's blog - http://www.addinktivedesigns.blogspot.ca/.  She has the most beautiful easel cards, but the butterfly ones really caught my eye.  These are my version of her butterfly easel cards.

The butterflies were cut using Sizzix - Beautiful Butterflies Bigz die, but I wanted my cards to be just a little bigger, so I cut out the largest butterfly on the die, I changed the bottom half of the butterfly to what you see here, and then enlarged it by 50%.  Once I had the template, I traced the butterfly shape onto cardstock that had been folded with the fold at the very top of the wings and cut it out.  This gives you a butterfly shaped card.  One butterfly needs to be scored horizontally between the upper and lower wings, this will create the easel.  The scored butterfly will be the top of the card.

You can see Tammy's flowers and the dies that I used to decorate the card. 
What you see there is one package of her flowers.
Then you need one more butterfly cut from cardstock.  As you can see, the cards are pretty with the butterflies all in one colour or with a combination of designer paper and plain cardstock.  This butterfly can be embossed with your favourite folder and is sponged around the edge with a slightly darker ink.  The smaller butterfly that goes on top of the card is the largest butterfly on the Beautiful Butterflies Bigz die.  It also can be embossed and should be inked around the edges too.

The bottom wings of the single butterfly are attached to the bottom wings of the butterfly card using Scor tape.                                         


This is what it will look like from the side and the back.  You may have to do some trimming to make everything match up perfectly.


The smaller butterfly is attached to the middle of the card using Scor tape and then the fun part - you get to decorate it!  I used Tammy Beaver's flowers which you can see in the picture above.  I think they are so beautiful and they come in many colours.   You can get them from Tammy, check out her website at http://www.dcands.ca/ and you can also get them at Scrapbooking Cafe Online, http://www.scrapbookingcafeonline.ca.  I attach these flowers to the cards with a little dab of hot glue.  I also used Memory Box - Tender Leaves and Die-namics - Leafy Flourish to decorate and poked some white floral pearls here and there among the petals of the flowers.


The inside of the card can be decorated in so many ways.  In this card I used an EK edge punch to create the brown scrolls, the Die-namics Leafy Flourish, and SU - BoHo Flower stamp and co-ordinating punch.  These little flowers are popped up and are the catching point for the card so it will stand up like an easel.  Half pearls in the center of the flowers finish it off.  The sentiment is from SU.

Thanks for looking :)


Thank You in Blue


I made this little thank you card for a lady who had purchased some of my Easter cards.  The paper is from The Tradewinds Matstack by DCWV.  This is a 6.5" x 4.5" book of patterned cardstock and it has such nice patterns, lots of nautical paper.  I took one of the sheets and folded it in half, so this is a smaller card, but just right for a quick thank you. 

The bottom layer of the label is made with a medium blue cardstock and Spellbinders Labels Twenty.   The next layer is white cardstock and Spellbinders Fleur De Lis Accents.  Before I removed the Spellbinder die I sponged a bit of light brown ink - Hero Arts Shadow Ink in Soft Brown.  The sentiment is from SU.  I popped up the white layer and added white half pearls. 

Then to decorate it a bit I added a piece of white satin ribbon folded in half, a few leaves in a brushed gold metallic cardstock using SU Little Leaves die, and a flower from Tammy Beaver.  These flowers are simply beautiful and come in many colours.  You can get them from Tammy, check out her website at http://www.dcands.ca/ and you can also get them at Scrapbooking Cafe Online, http://www.scrapbookingcafeonline.caI attach these flowers to cards with a little dab of hot glue.

Thanks for looking at my cards :)


Monday 4 June 2012

Baby Card in Pink


I made this card for a sweet little girl that came into our family.  I started with a white cardstock card, folded it and cut about 1/4" off of the bottom of the front of the card.  I used the Martha Stewart Doily Lace Edge Punch on the cut white edge.  For this card I picked three other pink cardstocks that worked well with the designer paper - a dark, medium, and light pink.  The medium pink cardstock I edged with the doily lace punch and layered it over the white lace.  I cut a strip of the darker pink cardstock 1 1/2" wide and used the doily lace punch on both long edges.  This was layered under the white lace.  By punching both edges, the inside of the card looks nice too!


The designer paper came from our local dollar store in a little package of baby paper, this I cut to fit over the top part of the card, leaving the lace underneath.  The tag is the light pink cardstock and was cut using Spellbinders Fancy Tags Two, this is a set that I have used a lot!  The flowers were cut using SU Floral Fusion die.  I rolled the petals in towards the center of the flowers using the end of a paint brush to help roll them.  They were then layered together and glued on the card.  They were cut from patterned paper in the package of baby paper.  The leaves were cut from scraps of cardstock in soft green solid and a soft green pattern using SU Little Leaves die.  Off white half pearls were added to the flowers and the tag.


The inside of the card has another piece of the designer paper.  The labels were made using the light pink cardstock, white cardstock, and Spellbinders Labels Twenty.  The sentiment on the front and the verse inside were from All Night Media - Baby Cakes set. 

Thanks for looking :)

White Butterfly Card

This card was also picked as one of the favourites of the week on Splitcoaststampers - June 10/12!  :)
I love cards that are all white, I think they are elegant.  The embossing folder I used for this card is called Flutterby Dreamscapes by Couture Creations, isn't it pretty!  I got it at Scrapbooking Cafe Online and couldn't wait to use it. 

So, I just ran a piece of white cardstock through the cuttlebug with this folder and attached it to a white card.  The butterflies on the embossing folder were about the same size as SU - Beautiful Wings butterfly, this is an embosslit that cuts and embosses at the same time.  I cut out 3 of the large butterflies and attached them over the raised butterflies for a fluttery effect.  I added white half pearls on the butterflies and throughout the embossed image.  The ribbon is white organza, it was there in my collection and worked perfectly.  The little label I cut with a punch I had.  The punch cuts it twice as big as you see here, I just put the label back in the punch and cut it down a bit smaller.

This is a quick and simple card to make but looks impressive when done.  Thanks for looking :)


Sunday 3 June 2012

Pink Birthday Card


This is a birthday card I made for my friend Sheryl.  I love making pink cards!  The card base is Bazzill cardstock, I'm afraid I don't know the name of the colour.  There is a layer of white cardstock and the designer paper is from K&Company - Madeline.


I used Spellbinders Label Twenty-Three to cut out the base under the flower, sponged around the spellbinder die before I lifted it off of the paper and then popped it up.  I used Hero Art Shadow Ink - Soft Brown for the sponging on this base, it just adds a bit of soft colour. 


The flower that I've used on this card is from Tammy Beaver and they come in the most beautiful range of colours and sizes.  You can get them from Tammy, check out her website at http://www.dcands.ca/ and you can also get them at Scrapbooking Cafe Online, http://www.scrapbookingcafeonline.ca/.  I attached this to the card with a dab of hot glue and then poked some white floral pearls here and there among the petals, I like the extra sparkle they give the flower!


The leaves are Spellbinders Foliage and I shaped them a bit on a soft mouse pad.  I added some extra leaves with the Martha Stewart branch punch.  Both of these were done with scraps of yellow green cardstock that I had laying around.


The pleated ribbon is some that I found at a craft shop while visiting my parents in New Brunswick.  The sentiment and banner are SU.  The pretty butterfly is from K&Company Bird & Butterfly Layered Accents.  A few half pearls in pink finished the front.


It's fun to make the inside of your cards look pretty too!  The designer paper is the same as the front and the edge punch is Recollections Deep Border Punch Flourish Dot.  The little rhinestone butterfly is a Dollarama find.  The verse I printed using the computer, I find this the easiest way to get the right size and shape that I want.  The words are half mine and half someone elses. 


Hope you enjoyed this card, thanks for looking!


Saturday 2 June 2012

Tri Shutter Card


I made this card about 6 weeks ago for someone special.  Tri shutter cards are easy to make and look so impressive when done.  If you're looking for a template try http://sarahsinkspot.com/blog/tri-shutter-card or just goggle - template for tri shutter card, there are lots of tutorials to check out too.  One thing to note, some of the templates use paper 5 1/2" x 11" and some use 5 1/2" x 12", pick the templates that are 12" in length.  This makes the card a little bigger and it's easier to measure the scores.


The card base was Very Vanilla from SU.  The paper I used was a sheet of beautiful designer paper, unfortunately I don't remember the company.  It was layered on Kraft paper from Recollections. 


The rose medallion on the front and the two little birds were from a Kaisercraft - Sweet Nothing Sticker Sheet.  This sheet of stickers has borders, flowers, birds, even a little angel.  I peeled off the roses and birds and put them on cardstock and then cut out around them.  I popped them up off of the card to give a little dimension.   I added some pearl bling and a little butterfly from K&Company - Susan Winget, Clearly Yours Nature.


The sentiment is from Thoughts & Prayers - SU.


This is how the card looks closed.  The butterfly is Vivienne/Darla butterfly from Memory Box, I love this butterfly, it's so pretty.


Hope you've enjoyed looking!


First Post :)

Ok, so this is my first blog post...I am slowly figuring out how to design this page, be patient it will get better.

I started making cards about 3 years ago.  My friend Irene Hirtle got a bunch of us started and there has been no looking back lol.  Irene has taught us sooooo many techniques and introduced us to some great products from Stampin' Up and with great patience I might add.  I've been hooked ever since. 

It wasn't long after we started making cards that we found Kristy Hardy and her store, Scrapbooking Cafe.  Kristy has so many products from so many companies.  You need to check it out - http://www.scrapbookingcafeonline.ca   Every time I'm there I find new things that I just can't wait to get home and play with.  When I need to go to my happy place - I go to Kristy's!

For the last 6 months, every Thursday I get together with the best ladies in the world - Carol, Sherrie, Sheryl, and Jane - and we make cards all day.  It is the most fun and I can't tell you how much we all look forward to it!  We all have our own style and at the end of the day, the most beautiful cards have been made.

I love taking a flat card and filling it with dimension and texture and colour and details, there are so many possibilities with each card.  To me, more is better, there's always room for one more little thing.  And I love birds, flowers, gardens - anything to do with nature.  I think you'll see that in my cards and hope you enjoy looking :)